Overblog
Suivre ce blog Administration + Créer mon blog

Recherche

Archives

Articles RÉCents

18 mai 2008 7 18 /05 /mai /2008 03:18

What to do with a prolific Meyer Lemon tree let alone two :-)? We have been trying to think of things to make, people to give lemons to, etc... and yesterday I happened to come across a recipe from tartelette.blogspot.com so I decided to give a try it a try plus the icecream machine has been sitting idle for some time, so it's time to put it to work.

The recipe turns out great, the hardest (time-consuming) part was to make the givre' shell... the sorbet was a piece of ... sorbet "-) the machine did all the work.  We had quite a bit of fun and a lot of oops - R's mom and I - trying to not mutilate the lemons while scooping their guts out :-P

The sorbet was very refreshing and tasty and more like a gelato with the cream base...this is going to definitely be a repeat throughout the summer!


Citrons Givres adapted from Tartelette who was inspired by Pierre Herme':

Serves 4

4 lemons
150 ml (2/3 cup) lemon juice (some coming from hollowing out the lemons + extra if needed)
150 gr. (2/3 cup) sugar
150 ml (2/3 cup) whole milk (less fat makes it curddle - I used half and half :))
150 ml (2/3 cup) water
1/4 to 1/2 cup chopped crystallized ginger (your taste - I would use 1/4 cup in the syrup but when transferring to the ice cream maker remove most of it down to may be 1 Tbsp)

1. Slice a tiny bit off of the bottoms of the lemons so that they can sit straight (relatively speaking). Slice the top off and keep that "hat". (pic 2) With a grapefruit knife, scoop as much of the flesh out of each lemon (pic 3)  and set in a fine mesh strainer set over a bowl.
2. With your hands or the back of a spoon press as much of the lemon juice as you can and measure 150 ml. Add extra lemon juice if needed.
3. Cut the candied ginger in tiny bits. (pic 5)
4. In a saucepan over medium high heat, bring the water and sugar to a bol. Add the ginger (pic 6) and let cool completely.
5. Add the milk and the lemon juice, stir and process in your ice cream machine according to your manufacturer's directions. (pic 7-8)
If you do not have an ice cream machine: freeze until soft serve consistency and mix with an immersion blender or whisk in a stand mixer. Put back in the freezer and repeat the operation 2-3 times, leaving enough time in between whippings for the mixture to get frozen.
6. Once your ice cream is ready, fill the lemon cavities and keep frozen until ready to serve. (pic 9)


It was in the 90s F here today, so these little gems were a big hit :-)


Partager cet article
Repost0
14 mai 2008 3 14 /05 /mai /2008 22:18

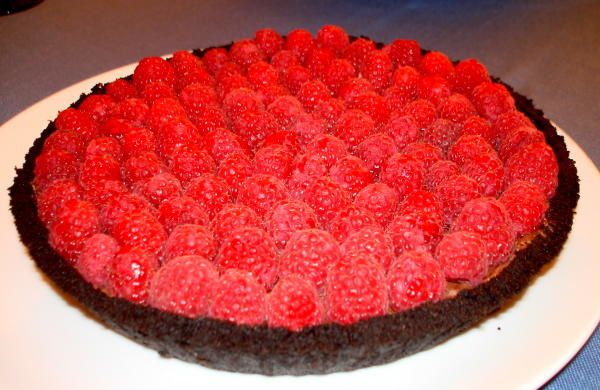
  I made this for a dinner reunion with my sis and frirends last weekend and it was ... delicious to look at and to eat of course ... and since it was in honor of my sis Biche and friends ...  I'll like to name it Tarte Biche :-)


Crust

20 Oreo cookies (scrape out cream = 40 halves)
1/2 stick unsalted butter, melted

1. Finely grind cookies in processor or blender. Add melted butter to the cookie crumbs and  blend until moist crumbs form.

2. Press crumb mixture onto bottom and up sides of 9-inch-diameter metal pie pan with a removeable bottom or use one of the disposable one, and cut the rim, bend it out like a flower to lift the pie out once ready to eat.

3. Refrigerate the crust for 30' or longer (can be done the night before)


Ganache Mousse
12 ounces semisweet chocolate or Valhrona noir amer 71% cocoa if you like it not too sweet- broken into small pieces
3 3/4 cups whipping cream
1/4 cup sugar (optional)

1. Melt the chocolate pieces on top of a double boiler (bain marie) over M heat. Once it's melted, gradually pour in the whipping cream (leave it out of the fridge for 10' so it's not too cold)-
2. Continue to stir well so it's well blended in with the chocolate. Turn down the heat if the chocolate/cream start to bubble, don't want it to boil.
3. Once well blended, remove from the heat and refrigerate for 15'.
4. Then take it out and whip it up with an eletric hand mixer until it's a of a ganache texture (creamy but not soft almost like truffle)
5. Pour into pie shell and decorate with raspberries (2 pints) start from the outside in.
6. Refrigerate for 4 hours or so, take out 5' before serving.

YUM!! enjoy.

PS> sorry no collage of the making of the pie ... as I was too busy making all the other dish for the dinner party :-)
Partager cet article
Repost0
14 mai 2008 3 14 /05 /mai /2008 21:40
A la facon de Back Yen... j'espere :) parce que la recette donne plein plein de clafoutis (a` suivre :)) et puis faute de vanille j'ai mis du Grand Marnier et je n'ai pas coupe' les poires en morceaux comme il faut ... c'est seulement au telephone avec Trang ce matin que j'ai appris les details que j'ai rate's. Et pourtant, pourtant ... c'etait delicieux !!! (Merci a Bach Yen et Trang... ddi mo^t. ddang` hoc. mo^t. xang` kho^n :) comme le diraient nos ancetres bien-aimes' :) et Hang Thuy pour les conversions des mesures metriques)


Ingredients:
> 4 oeufs...... 4 eggs
> 80 g de sucre ...... 8 tablespoons (leveled)
> 1 sachet de vanille ....... 1 teaspoon vanilla extract ( I used 2 Tbsp of Grand Marnier instead :))
> 3 verres de lait ...... 2 cups whole milk
> 50g o 60g de farine de blé .......... 10 tablespoon multi-purpose flour (leveled)
> 5 cuillerées à soupe rases de farine de maizena ...... 5 tablespoon corn starch (leveled)
> 3 poires ...... 3 pears

Preparation:

1. Battre les oeufs avec du sucre , rajouter la farine de blé , la maizena, continuer à battre.....
Beat the eggs with the sugar, add the flour, cornstarch and continue for another minute or so. (pic 2-3)
2. Rajouter les autres ingrédients , bien les mélanger à la spatule .... Add the milk, vanilla and mix well with a spatula. (pic 4)
3. Verser la pâte dans un moule beurré , disposer les poires coupées et parsemer à la surface avec du beurre coupé en dés .... Pour the batter into a well-buttered pie dish half-way up, place the cut pears into the batter, pour some more batter on top of the pears and top with some cubed butter. (pic 5)
4. Mettre au four à 170°C environ 1/2H... cook in a pre-heated oven at 325 F for about 30 min, until golden. (pic 6-9)
5. Remove, sprinkle with some powder sugar if you wish. Eat warm.


Partager cet article
Repost0
5 avril 2007 4 05 /04 /avril /2007 20:21

I hope to be up and running with a new fancy dandy laptop next week and share with you some new recipes... In the mean time, here is a bouquet of spring blossoms for you :-) Cheers!


" Toute fleur qui s’ouvre, on dirait qu’elle m’ouvre les yeux. Dans l’inattention. Sans qu’il y ait aucun acte de volonté d’un côté ni de l’autre.

Elle ouvre, en s’ouvrant, autre chose, beaucoup plus qu’elle-même. C’est pressentir cela qui vous surprend et vous donne la joie. " 

 From my favorite Swiss poet Philippe Jaccottet -  Et, néanmoins.  And nevertherless ...

" They haven’t lasted.

Just enough time to exist as small balls - smooth, dense little globes - a few days; then - obeying an inner impulse - time to open, to uncrinkle, like so many dawns about a golden haze of sunlight.

Like so many gowns, if you will. If the insistance of the daydream prompts you to it.

Opulent and frothy, like certain clouds.

An explosion: relatively slow, perfectly quiet.

Grace stealing out of the flowers.

Because they bow under their own weight, some down to the earth, it looks as if they’re greeting you, though you’d prefer to have greeted them first yourself.

Grouped this way: one thinks of a ballet movement.

As in Carpeaux’s La Danse, in front of the Opéra (at least the memory of it which comes back to me): one group turned toward the sky, the other, toward the earth.

To grasp them, you’ll have to distance yourself. "


Philippe Jaccottet, Cahier de verdure suivi de Après beaucoup d’années - Translation by Judith bishop - The peonies.

... See my Tabblo>


Partager cet article
Repost0
12 mars 2007 1 12 /03 /mars /2007 02:27

Monkfish are sometimes known as "allmouth" since the fish is mostly head and the head is mostly mouth and they are ugly looking with their depressed head ... so make sure you buy the fillet  and don't ask for the whole fish or it might turn you off :-)

The meat when not over-cooked is just a lobster away :-) If you like lobster you will love this ugly fish for its great texture and mild flavor.

Monkfish is one of my  favorite fish and this soup is my version of canh chua which for me hit the spot right on when I crave for some canh chua (sour fish soup) which I sometimes sprinkle with some chopped bird's eye chilis for a hot and sour version... sluuuuurp!

Ingredients:

- 1 medium size monkfish fillet

- 4 large tomatoes

- some fresh dill

- 1 tsp Knorr tamarind powder

- 1 tsp of salt

- 1 tsp of sugar

- 3 Tsp of fish sauce

- 1/2 T canola oil

Preparation:

- Wash, and score the top of the tomatotes (pic 2), drop in some boiling water for 1 couple minutes, remove, let cool and peel the skin off.

- Trim, wash  (pic 4) and mince the dill

- Wash, dry and sprinkle the salt on the monk fish fillet, then slice into 1/8 inch thick slices (pic 5,6)

- Pour the canola oil into a small pot over Medium High heat. When the oil is heated through, drop the tomatoes in and stir fry until the tomatoes are cooked to the consistency of a thick tomatoe sauce. About 5 minutes or so. (pic 7)

- Add  just enough water to cover the tomatoes and dilute it to a thick soup, add the tamarind powder, sugar then the fish, dill and fish sauce (pic 9).  When the soup start to boil, lower the heat, the fish is done when it has just turn opaque. Turn off the heat, let it a rest for a minute or so and serve hot.

- Have some minced bird-eye chilis on the side for those who like it spicy.


Partager cet article
Repost0
4 mars 2007 7 04 /03 /mars /2007 19:02


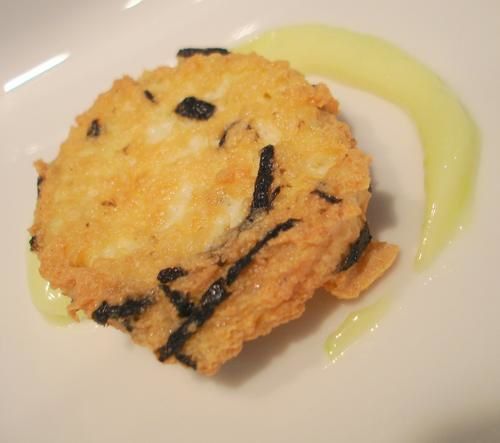
  This is not the most healthy dish, but once in while you need a doze of grease in your body to oil those old joints I'd say to justify having these delicious things :) The wasabi mayonnaise is key here, you can't have one without the other ok?


Ingredients:
- 1 block of tofu medium firm
- 2 eggs
- 1 sheet of nori (japanese seaweed)
- 1 Cup of oil for deep frying
Dipping Sauce:
- 3 T japanese Mayonnaise
- 1 t wasabi (more if you like it hot :))
- Mix together well  (pic 5,6) while to egg-tofu is frying.

Serve 4-6

Preparation:
- Drain the tofu and dry with paper towel
- Scramble the tofu with the eggs until well mixed (pic 3)
- Shred the nori with scissors and mix in with the tofu and egg (pic 4)
- Heat oil in skillet over medium high heat
- Drop a tiny bit of the mixture into the oil, if it starts to sizzle right the way the oil is ready
- Make egg-tofu quenelles with a soup spoon and drop them into the hot oil
- Turn them over once with a spatula when they are golden on the bottom side
- Remove well both sides are golden and drain  on a double layer of paper towels.

- Serve with the wasabi mayonnaise sauce, hot. yummy good!!


Partager cet article
Repost0
1 mars 2007 4 01 /03 /mars /2007 21:26


Translation: The Kaiseki dinner was most delicious :)


Whilst my  dear BF has had his share of Kaiseki in the land of the rising sun, this is also his first one on this side of the Pacific and we both enjoyed it so much, it's like a mini vacation to Japan. 


What is Kaiseki?


"Kaiseki's origins date back to the 16th century. Meaning "stone in the stomach", kaiseki referred to the practice of Zen priests of tucking hot stones wrapped in towels into the bosom of their kimono sashes. The heat was intended to ward off any hunger pangs during their morning and afternoon prayers. Later, kaiseki became a simple seasonal vegetarian meal served after the chanoyu or tea ceremony. Today, it is considered an art form that observes the harmony between food and nature, and takes the diner on an odyssey of flavors, textures and colors. Like the acts of a play, each dish is a component that strikes high and low chords yet harmonizes to create the whole."  excerpt from an article by Linda Furiya, SF Chronicle, May 17, 2000


Well, I can tell you that the Kaiseki dinner that we had at Kaygetsu is nothing like stones in the stomach :) On the contrary, it's light and wonderfully tasty.

... See my Tabblo>


Partager cet article
Repost0
1 mars 2007 4 01 /03 /mars /2007 03:07

   I don't know if you've noticed it in your area, that around Tet there are all kinds of grapefruit in the market, pommelo, pink, ruby, yellow, white you name it. 
Also remember that as a tradition at Tet, we usually have a platter of fruit on the altar on the first day of the year composed of five different kinds of fruit such as du*a (zu*= more than enouph), xoai` (xai`=to spend), tho*m (= as in fragrant) to keep you smelling heavenly and having more than enough to spend for the rest of the year :) and I've forgotten the last two kinds of fruit.
    In any case, I think we should add Oro Blanco (white gold) to the platter, don't you agree? :)
Oro blanco is a cross between a grapefruit and an acidless pommelo and it's my favorite of all grapefruits because it's not at all bitter, but sweet and fragrant. More on the glory of grapefruit in the article at the end of this post.


There are many recipes for grapefruit salad out there. There is the vietnamese goi? with prawns and spicy fish sauce, the fusion salad with jicama, rice vinegar and minced mint, etc..  Here I like it mixed with other fresh fruits like strawberries, blueberries, apple and doused with kirsch then served as a healthy snack or dessert with some low fat yoghurt.

Ingredients:

- 1 oro blanco

-  a handful blue berries and strawberries

- 1/2 a fuji apple

- a dash of Kirsch

Preparation:

- Wash the berries, cut the strawberries in fourth or sixth and put in a bowl, sprinkle with a bit of sugar if the strawberries are not in season.

- Peel the grapefruit, trim away the pith while holding  fruit over a bowl to catch the juice. Section fruit; remove membranes. Pull out the sections and mix with the berries in the bowl.

- Peel and cut the apple into bite size, mix well with the grapefruit juice in the bowl to keep them from turning brown. 

- Sprinkle the fruit salad with kirsch and keep in the refrigerator until ready to serve.

" Hanging around on trees all about California: grapefruits -- heavy with juice, tartly sweet, beguilingly perfumed. Round and yellow as happy faces or suns, they seem to ripen just as the general populace sinks into its annual round of post-holiday dietary self-chastisement.
Coincidence? Perhaps. But we say run with it.

Look beyond the obvious salvo of half a grapefruit for breakfast attacked with a jagged spoon, and you'll find a marvelous fruit for peeling and eating out of hand. There's nothing like it for inducing simultaneous feelings of gastronomic piety and delight at recapturing a long-lost pleasure. It's sensual: the aroma of essential oils as they spurt daintily from the pores of the thick skin, the ripping sound of the tenacious segments being pulled apart, the juice dripping down. And it's delicious.

But don't stop there. Cook with grapefruit. Use its juice to flavor sauces. Section and scatter it. Bake with it. Candy its peel. Grapefruit is milder and sweeter than lemon, but it can be used in many of the same ways -- squeezed on grilled fish, made into a brightly flavored curd (like pie filling or a jam-like spread for biscuits). And if you're looking for gorgeous color, red grapefruit offers extra plate appeal.

The notion that red grapefruit is sweeter than white or yellow grapefruit is, however, a myth, according to citrus specialists. (The story grew out of a marketing campaign by Texas growers.) Red grapefruits get their color from lycopene, which has health benefits (it's an antioxidant) but does not affect flavor.

Sweetness is determined, rather, by the length of time the fruit has been hanging on a tree. A grapefruit picked in December isn't as sweet as one picked in February.

All the different varieties have their fans. California reds include the medium-pink Rio Reds from the Coachella Valley and the Star Ruby from the Central Valley (and Texas). Yellow Marsh is a familiar yellow variety and the Duncan, while not usually labeled as such  in supermarkets, is a reliable white.

For those who don't like the tartness of a true grapefruit, Oro Blanco -- the half-grapefruit, half-acidless pummelo -- is sweeter, good for salads. [...]

For cooking, select heavy fruit, which indicates juiciness. (If you're making a batch of candied peel, however, lighter fruit will indicate more peel.) Before juicing, roll a grapefruit under your hand on the countertop to help extract the most juice. (Editor's note: If it's chilled, warm it slightly in the microwave to release more juice.) Avoid lumpy fruit, which may be over-ripe.

And finally, for those whose resolute January superegos care about such things, here's a reassuring thought: Grapefruit is low in calories (40 to 60 each) and high in vitamins C and A. So peel away."

By Donna Deane
Los Angeles Times

Partager cet article
Repost0
24 février 2007 6 24 /02 /février /2007 22:16

   It's still cold enough around here for some hot creamy savoury soup ... heartwarming, especially with the fire dancing in the fireplace and the rain sluicing the windowpanes.  I think it wants to come in and have some too :-)

Kabocha also known as Japanese Pumpkin is similar in texture and flavor to a pumpkin - sweet-potato combo. Its deep green skin striped with celadon colored stripes contrasts beautifully with  an intense yellow-orange color on the inside. It's quite hard to cut open, you'll need a cleaver and a hammer :-) 


INGREDIENTS:
# 1 small Kabocha squash, halved and seeded
# 1 tablespoons olive oil
# 1 Can of Chicken broth low fat low sodium
# 1 Cup of Cream

Optional:
# 1/16 teaspoon allspice
# 1/16 teaspoon sea salt
# 1/16 teaspoon red chili pepper flakes
# dash of nutmeg


PREPARATION:

1. Preheat oven to 425° F

2. Line sheet pan with foil paper

3. In a small bowl, whisk allspice, salt, chili pepper flakes, nutmeg with 1/2 tablespoon oil. Brush the inside flesh of squash with the spice mixture (reserve any remaining) and lay cut side down on lined sheet pan.  (pic 1) Roast 30 minutes or until very soft. Transfer from oven and cool enough to handle.

4. When kabocha is cooled, scoop the insides into a small pot. Mash it with the back of a wooden spoon; (pic 3) add the chicken broth and gently simmer for 10- 15 minutes.

Ladle soup in small batches into the blender and blend until smooth (pic 4). Return to pot, add cream, simmer for 5 minutes or so and serve immediately.

I like to sprinkle mine with a few extra chili pepper flakes for a bit more zinnnnng :)


Partager cet article
Repost0
11 février 2007 7 11 /02 /février /2007 19:46

I haven't had traditional cha gio rolled in Vietnamese rice paper for a while, and these were just delicious, maybe it has something to do with Big T's 10 ngon' tay bup' ma(ng rolling them :P Look at the picture below, don't they look good? :)


INGREDIENTS:
- 1 lb ground pork
- 1 lb Phillips crab meat
- 1/2 onion
- 1/2 medium size jacama (cu? dda^u.)
- 1 Medium carrot
- 1 handful of wood ears mushroom
- 1 small bundle of bean thread (mie^n')
- 1/2 tsp salt and freshly ground pepper
- 1 egg
- Vietnamese rice paper - sm Rounds of rice paper (banh-trang), each about 6 inches-in diameter


PREPARATION:
- Filling:
1) Soak the mushroom in warm water until soft, drain and chop into small bits.
2) Also soak the bean thread in warm water until soft, drain and chop into small bits.
3) Peel and chop up the onion, jicama and carrot.
4)  In a large bowl, combine mushrooms with the ground pork, crab and chopped up mushroom, vegetables and bean thread. Mix with your hands to blend.
5) Break the egg over the mixture and mix well. Set aside.
- Assemble the rolls:
6) One at a time, immerse a sheet  bowl of hot-warm water to soften the sheets for handling. Work with only a couple of sheets of rice paper at a time. Quickly remove it and spread flat on a dry towel. Do not let the sheets touch each other.
7) Place a tablespoon of the mixture on the rice paper, fold one side of the paper over the mixture, then the other side. Roll from bottom to top to completely enclose the filling. Continue until all of the mixture is used.
- Fry the rolls:
8) Pour 1 to 1 1/2 inches of oil into skillet and heat to 325F. Working in batches, add rolls to skillet, but do not crowd or let them touch, or they will stick together.
9) Fry over moderate heat for 10 to 12 minutes, turning often, until golden and crisp. Remove the rolls with tongs and drain on paper towels. Keep warm in a low oven while frying the remaining rolls.

Serve hot with nuoc cha^m' and optional bib lettuce, mint and rice noodle. For our New Year dinner we serve them as appetiser followed by a soup and a mixed green salad so we left out the optional accompaniment.


Partager cet article
Repost0